Vendia API Authentication
On each project workspace, users can access the underlying resources - data, files, etc. through a GraphQL API with HTTPS transport. Vendia allows workspace owners to control the API access and usage through API settings.
You can connect to a workspace using the following methods:
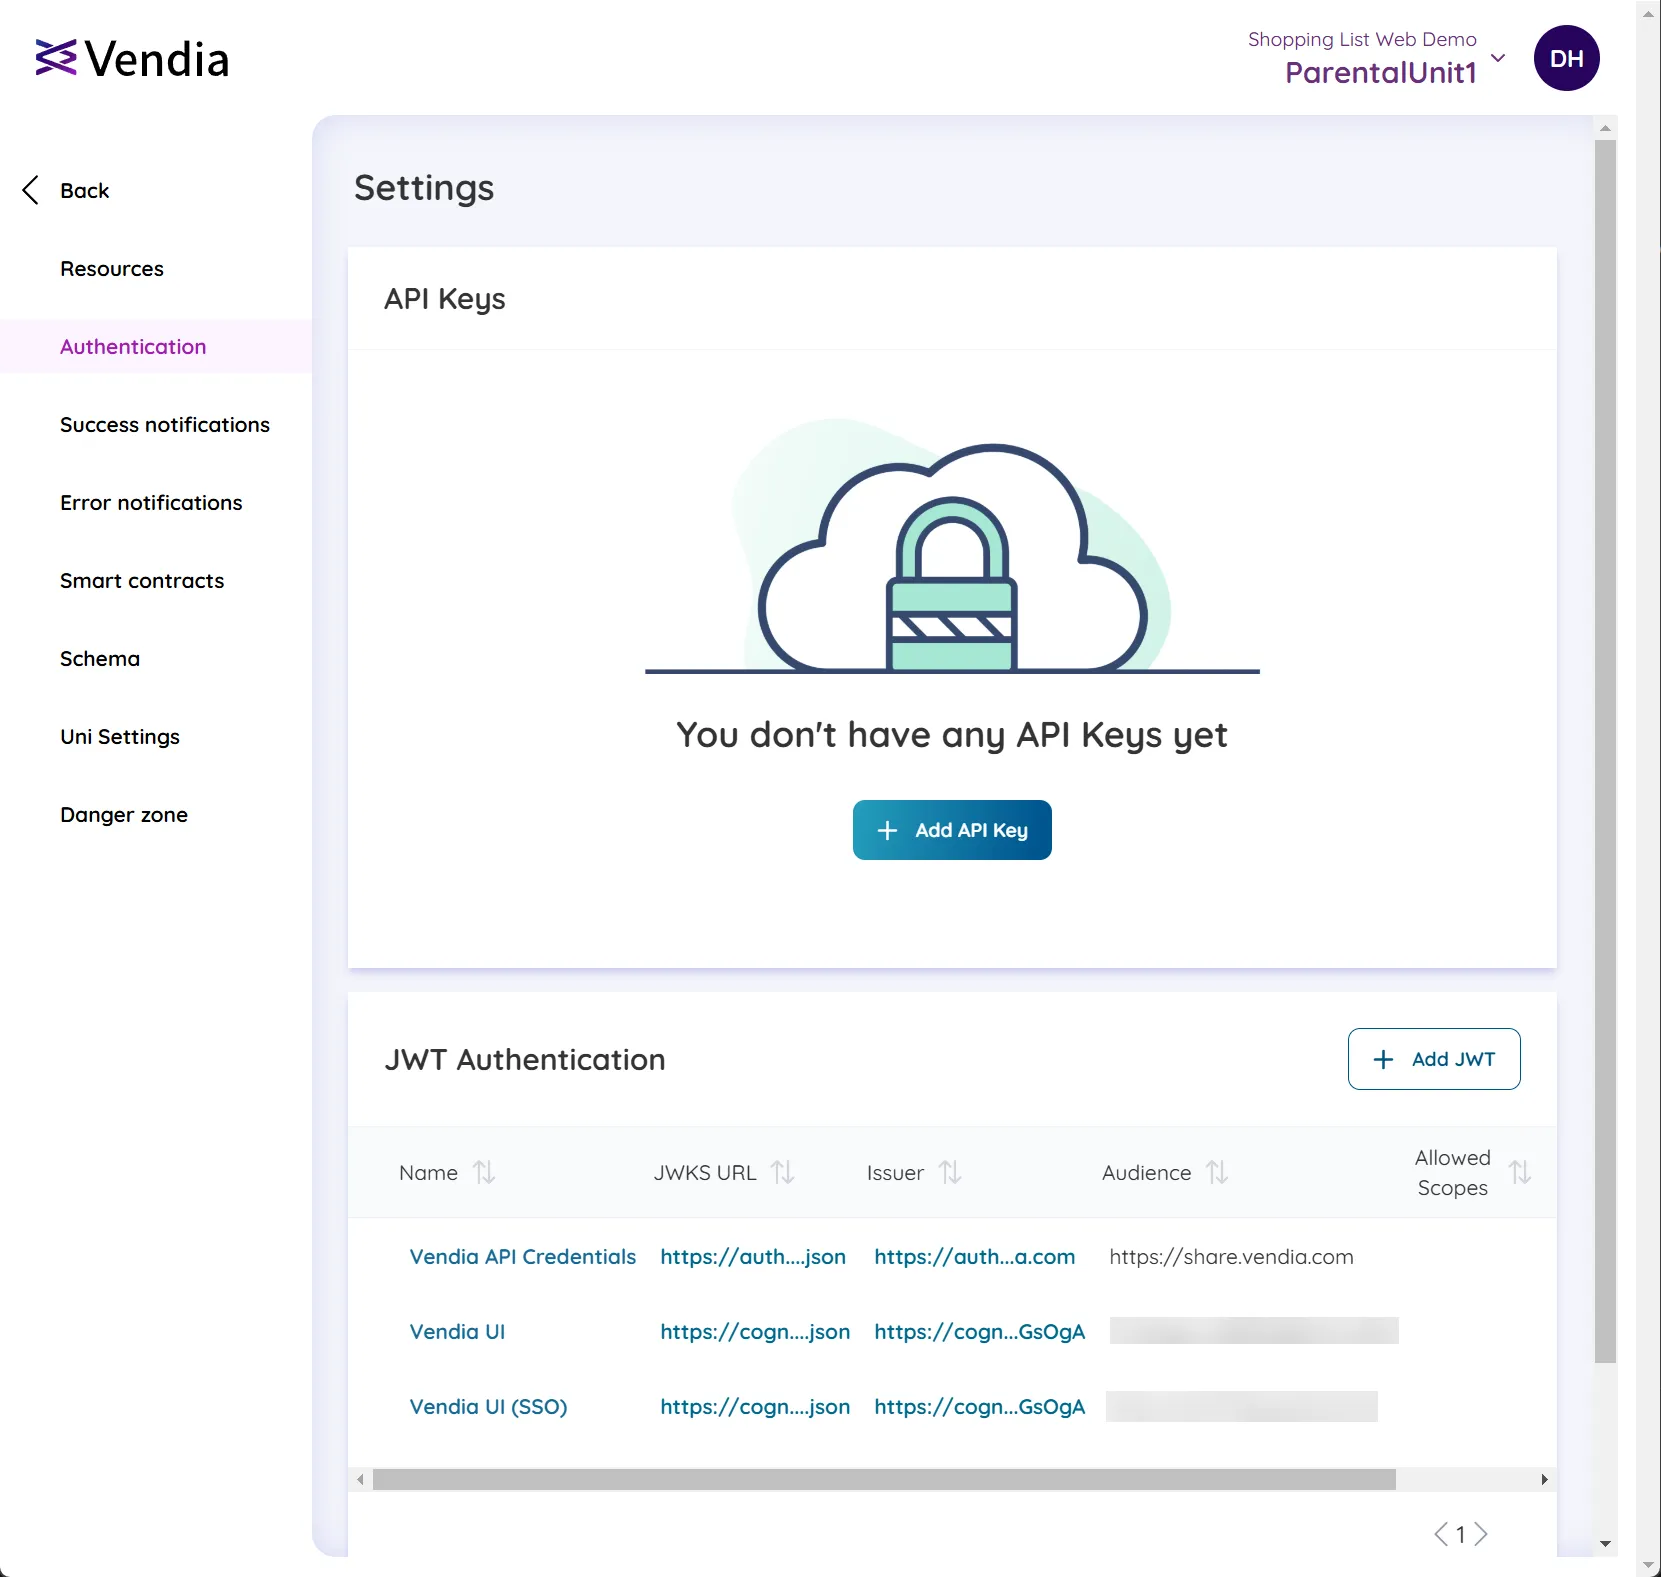
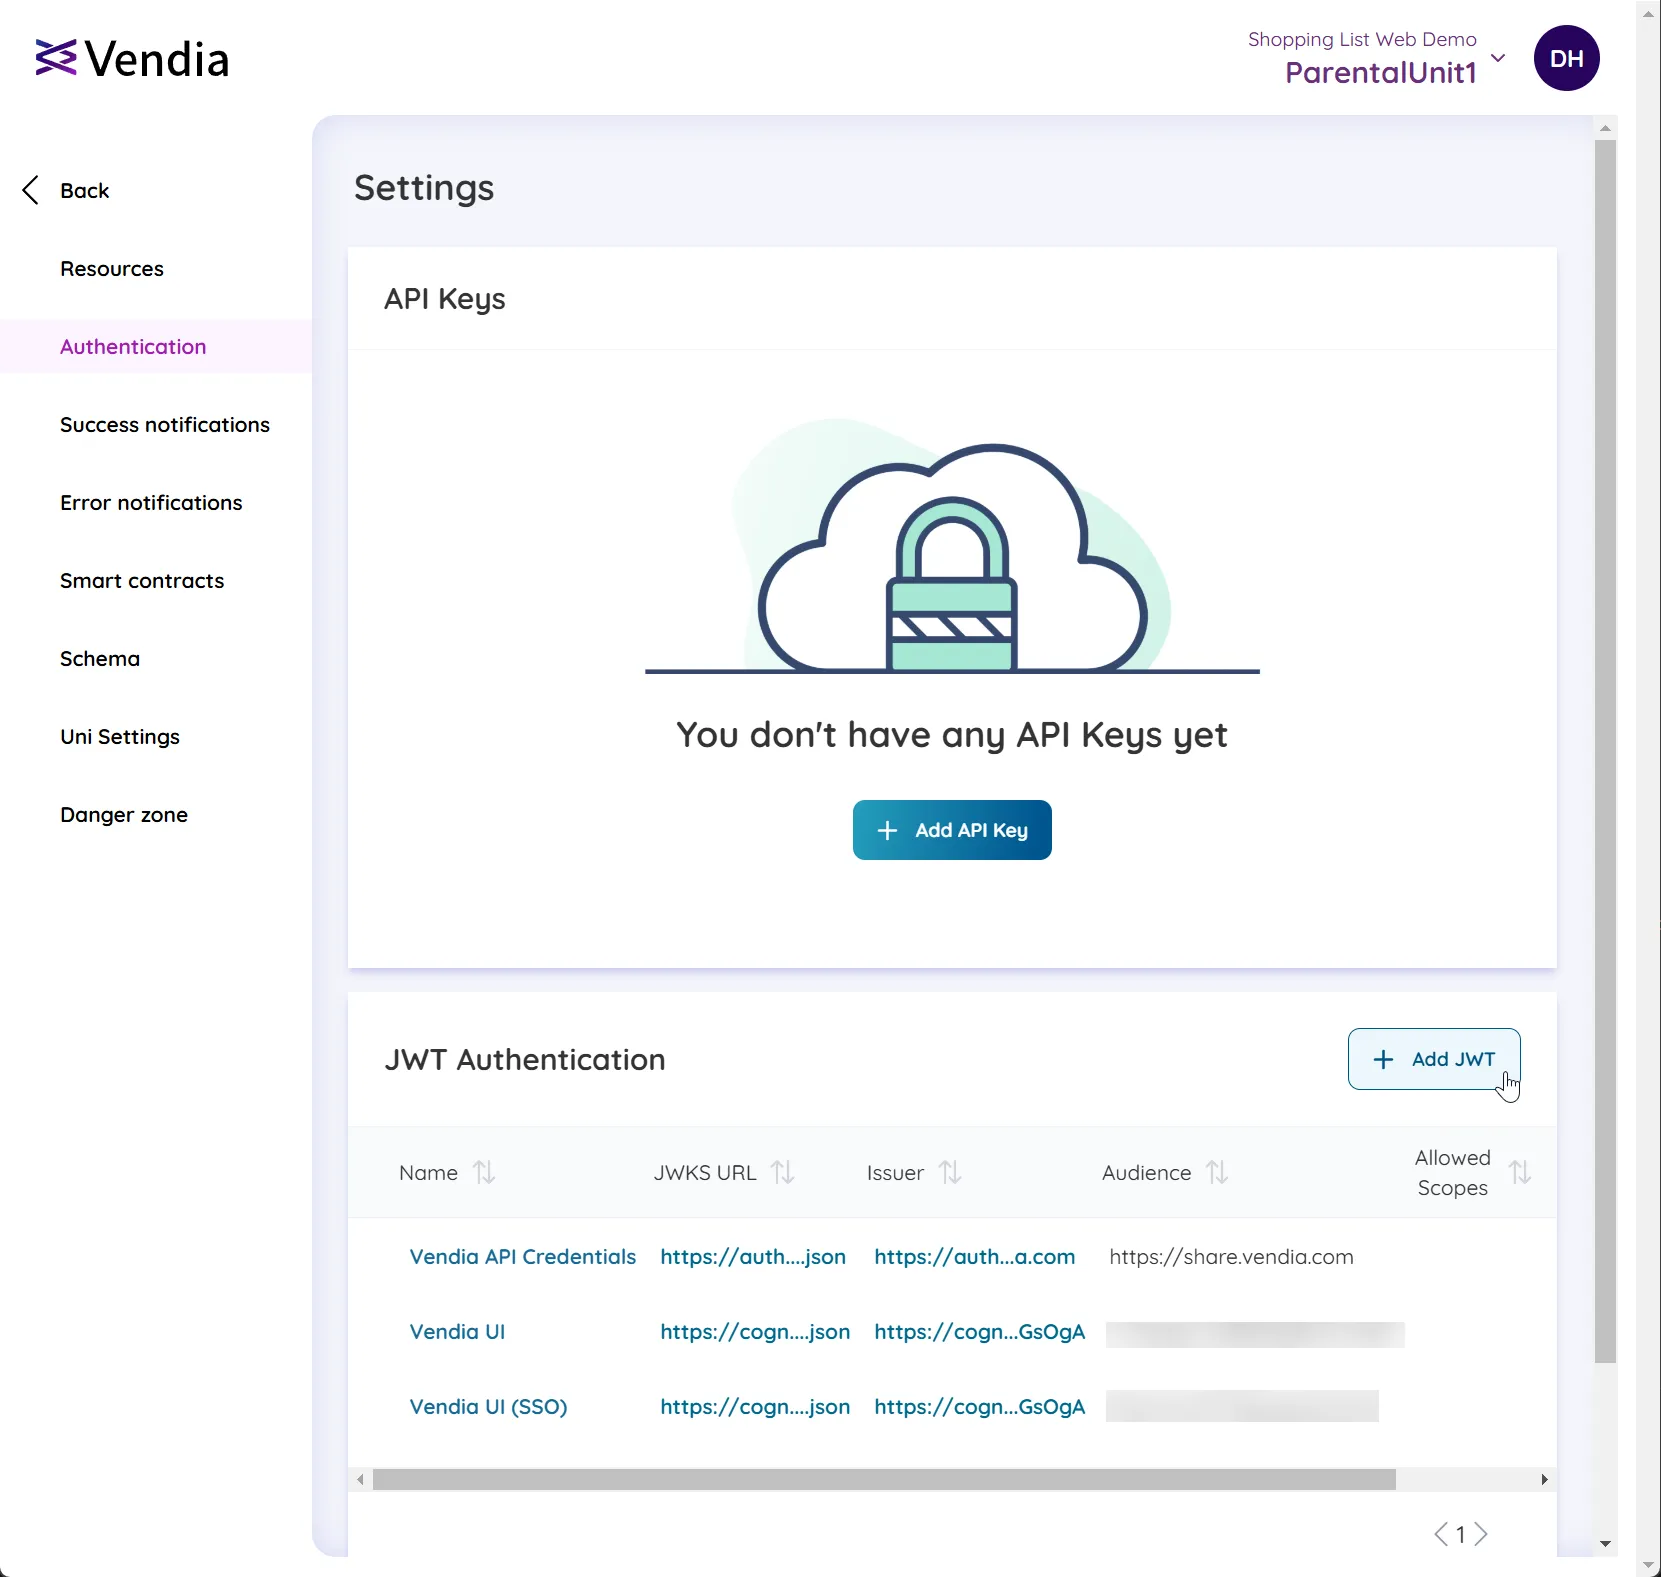
API Keys
To enable programmatic server-to-server access to the workspace, Vendia provides the ability to dynamically create an unlimited number of API Key(s). An API Key may optionally have an expiration if the data access use-case is time-bound.
Note: API Keys are secrets and should be stored securely. The API Key is only viewable at the time of creation.
An API key can be created via the following methods:
Creating an API Key in Vendia Console
To create an API Key via the Vendia Console:
-
Navigate to your project landing page.
-
Choose the workspace for which you would like to add an API Key and click ‘Settings’ to navigate to workspace settings.
-
Click ‘Authentication’ —> ‘Add API Key’
-
Provide a
Namefor the key, select theExpirationvalue, and click ‘Create’.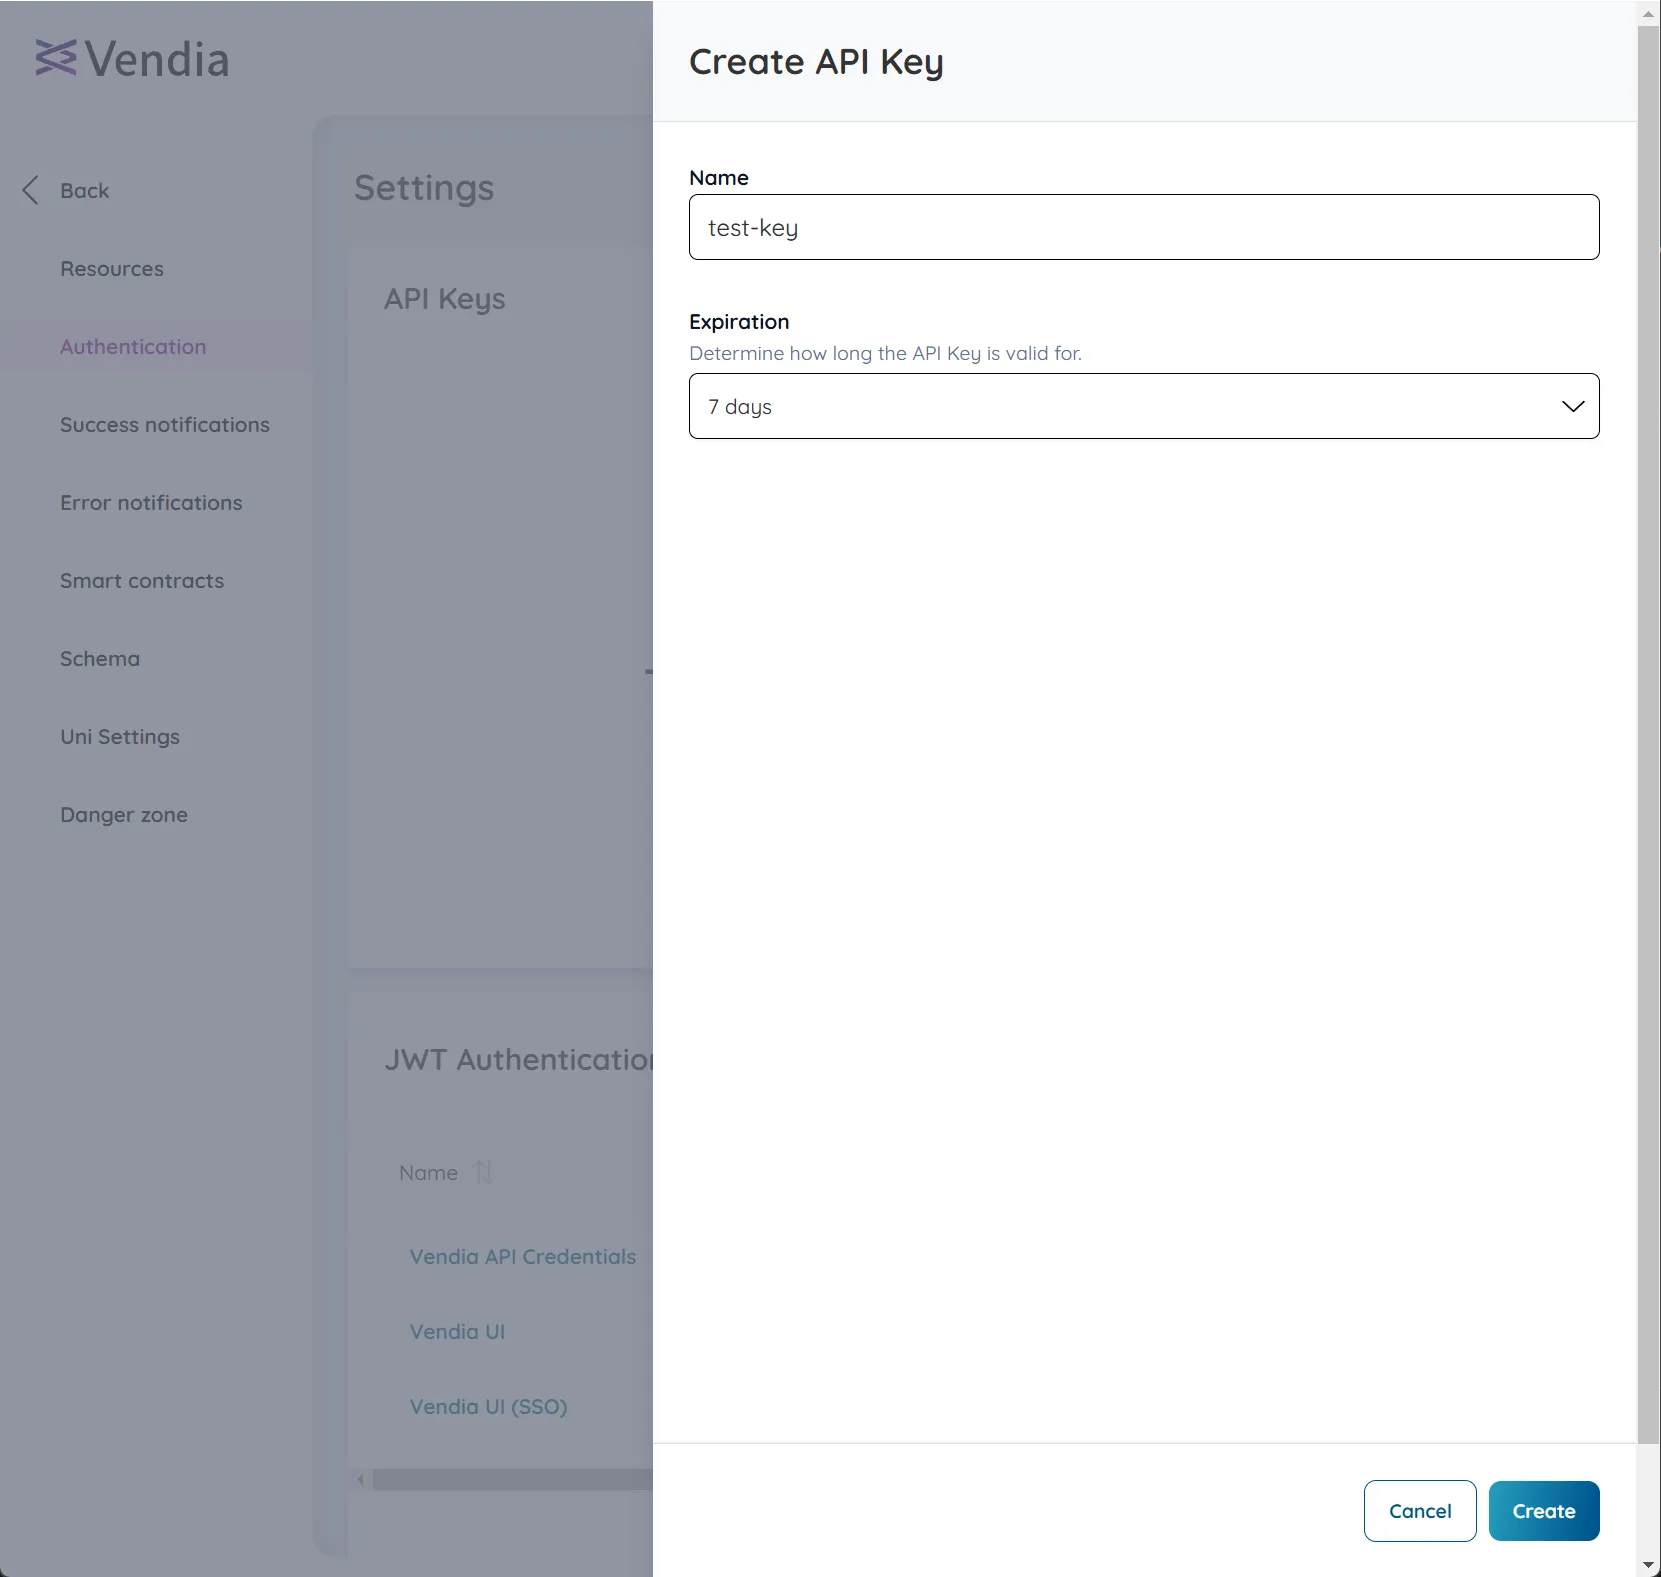
-
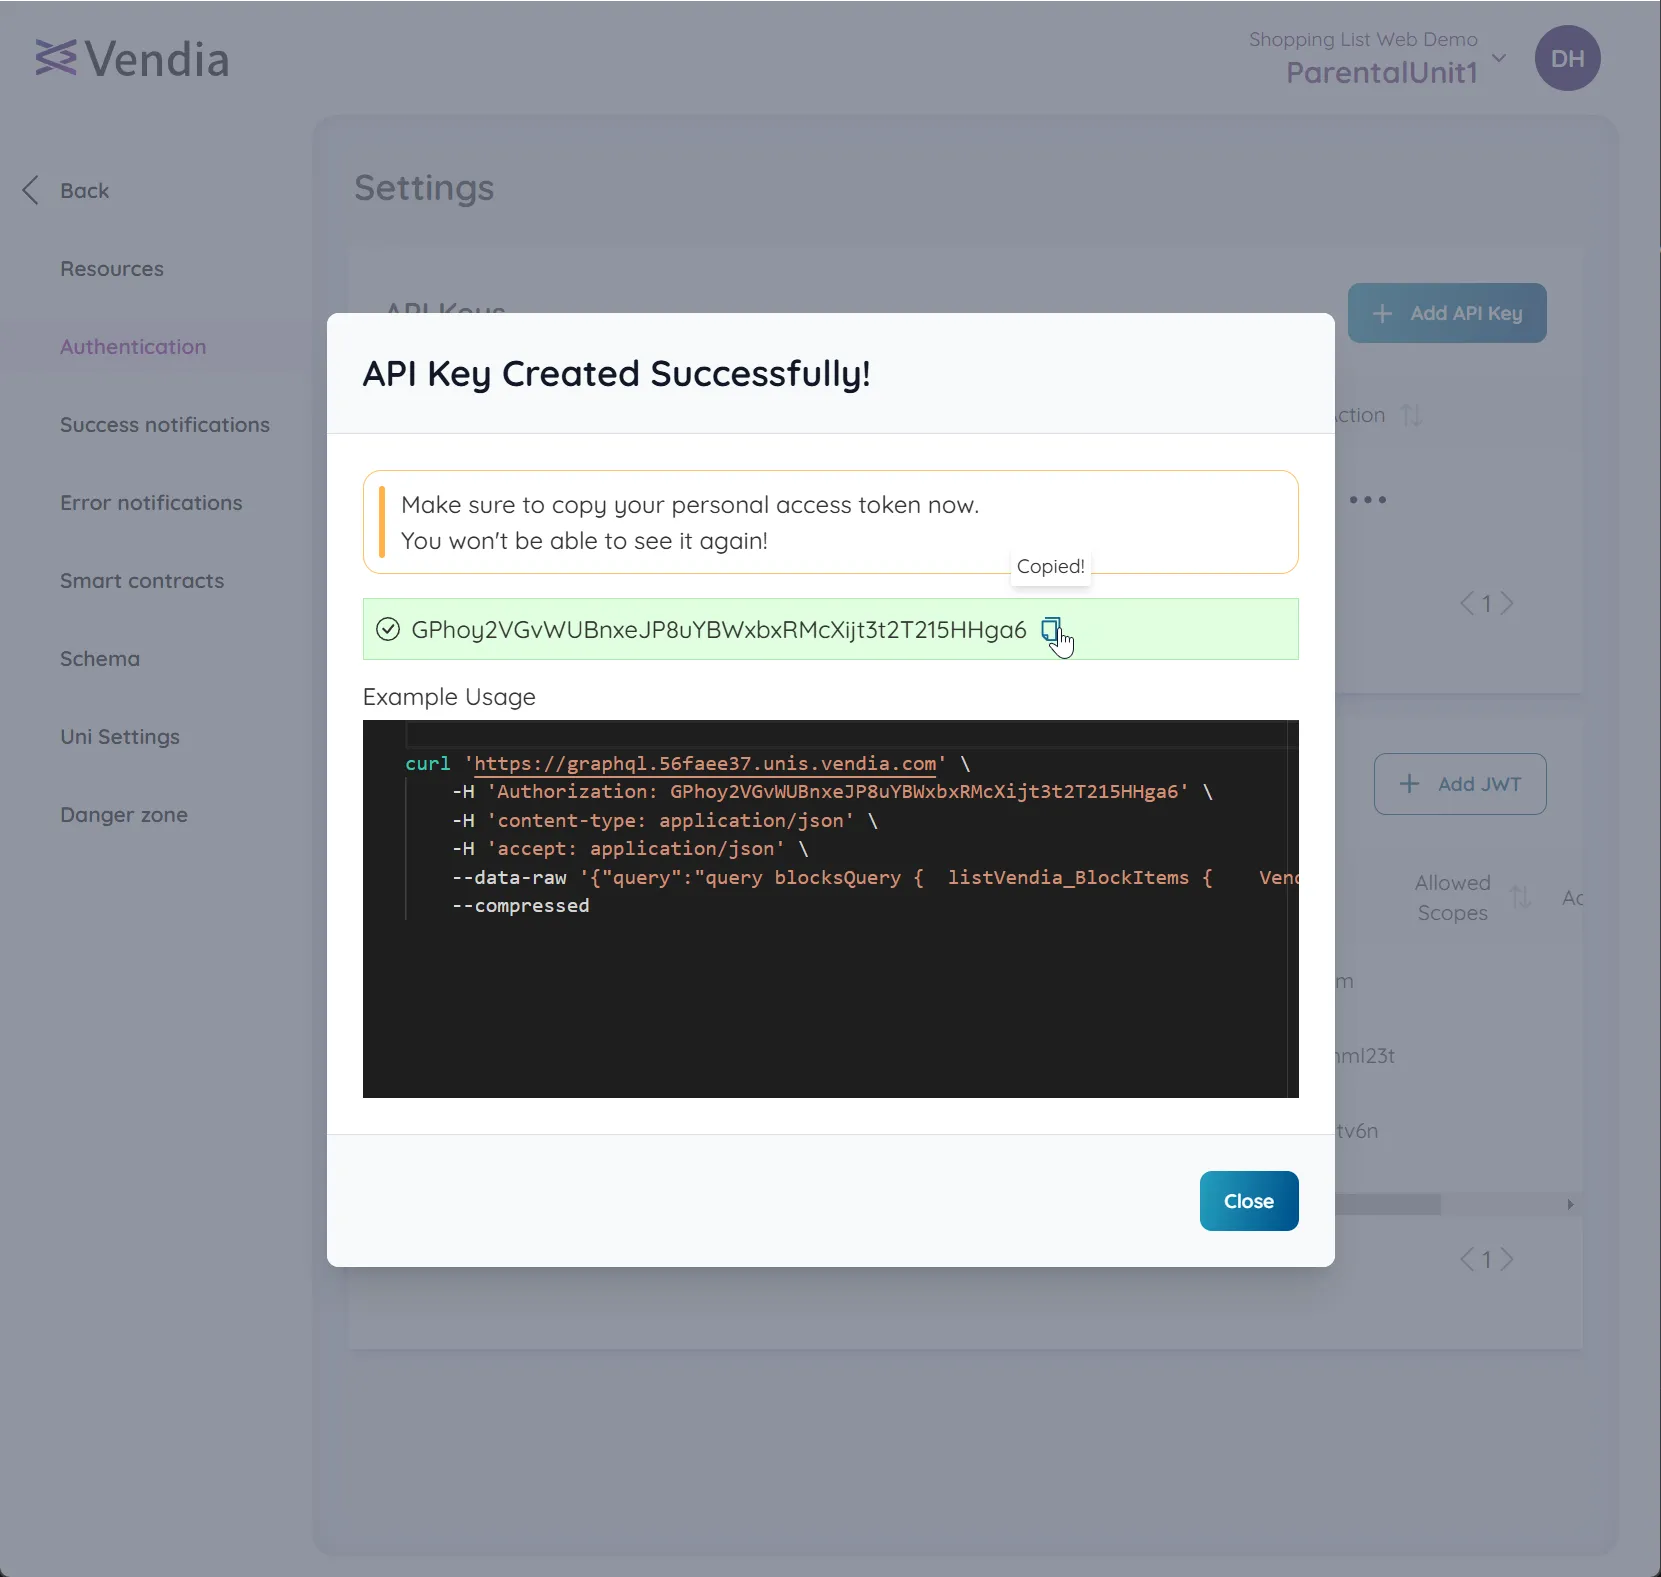
Once created, the API Key will be displayed on the screen.
Copy the key and store it securely as it will not be displayed again.
-
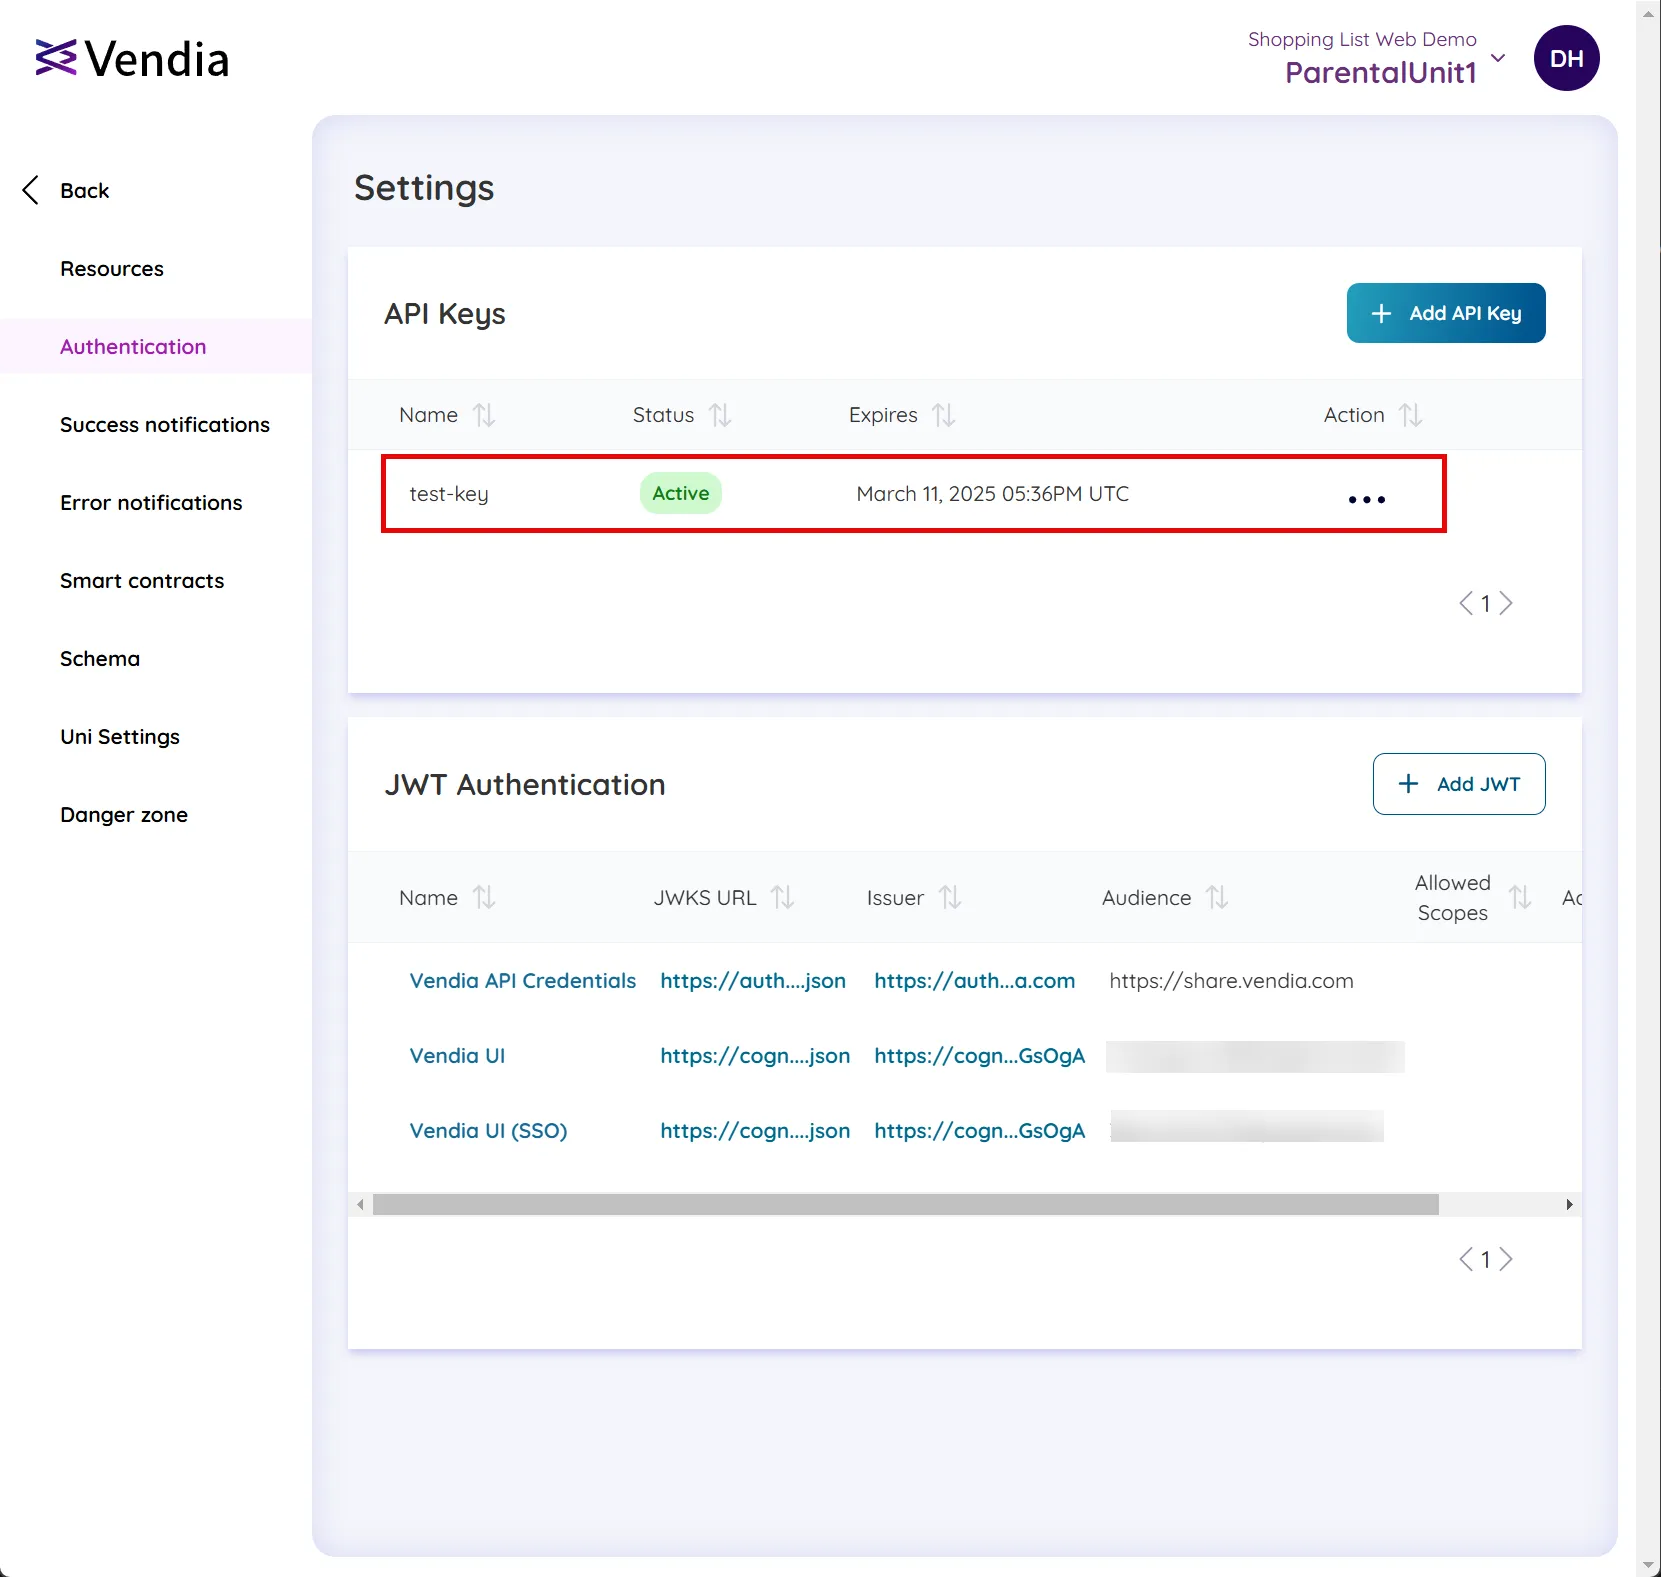
Click ‘Close’ to finish. You will then see the API Key listed in the ‘API Keys’ section of the workspace Authentication settings screen.
Creating an API Key via GraphQL Mutation
API Keys can also be created via the GraphQL Explorer or programmatically (if you have already have a key configured).
mutation addApiKeyMutation { addVendia_ApiKey( input: { name: "my-api-key", expiry: "2024-01-01", status: ACTIVE } syncMode: NODE_LEDGERED ) { result { apiKey _id } }}Creating an API Key via the CLI
To learn how to set up the Vendia CLI see our CLI docs
share node add-api-key \ --uni 'my-uni-name' \ --node 'my-node-name' \ --name 'my-api-key-name' \ --expiry '2030-01-01'Using an API Key
An API Key can be used to access the workspace’s resources via the following methods:
Using an API Key via GraphQL API
The API Key should be sent via the Authorization header of each GraphQL request
curl 'https://xxxxxxx.execute-api.us-west-2.amazonaws.com/graphql/' \ -H 'Authorization: MY_API_KEY_HERE' \ -H 'content-type: application/json' \ -H 'accept: application/json' \ --data-raw '{"query":"query blocksQuery { listVendia_BlockItems { Vendia_BlockItems { blockId blockHash } }}","variables":null,"operationName":"blocksQuery"}' \ --compressedUsing an API Key via GraphQL WebSocket API
The JWT should be sent in the first message after connecting to the WebSocket
const subscription = ` subscription onBlockChanges {  onAddVendia_Block {    error    result {      blockId      transactions {        _id        mutations      }      _id      status    }  }}`;
const webSocket = new WebSocket(  "wss://xxxxxxx.execute-api.us-west-1.amazonaws.com/graphql", //Use your GraphQL WebSocket API here  "graphql-transport-ws");
webSocket.addEventListener("message", function (event) {  const data = JSON.parse(event.data);  console.log("Message from server ", data);  if (data?.type === "connection_ack") {    console.log("Received connection_ack");    console.log("Sending subscription...");    // Send GraphQL Subscription after Authentication handshake    webSocket.send(      JSON.stringify({        id: "4f4ac00c-8055-44ac-a048-c4c2c77573ce", // Note: should be unique per subscription        type: "subscribe",        payload: {          key: "vxyo52", // Note: should be unique per subscription          query: subscription,          data: `{"query":"${subscription}","variables":{}}`,        },      })    );  }});
// Send Authentication messagewebSocket.addEventListener("open", function () {  webSocket.send(    JSON.stringify({      type: "connection_init",      payload: { apiKey: "MY_API_KEY_HERE" }, // Use your API Key here    })  );});
Using an API Key via Vendia SDK
const client = createVendiaClient({  apiUrl: "https://xxxxxxx.execute-api.us-east-1.amazonaws.com/graphql/",  websocketUrl: "wss://xxxxxxx.execute-api.us-west-1.amazonaws.com/graphql",  apiKey: "MY_API_KEY_HERE",});
const blocks = await client.blocks.list();client.blocks.onAdd((block) => console.log("New block added:", block));
JWT Authentication
JSON Web Tokens (JWT) are an open, industry standard RFC 7519 method for representing claims securely between two parties. Enabling JWT Authentication for your Vendia workspace allows for both client-to-server and server-to-server access. With this authentication method, you specify your external identity provider’s public key details so that the workspace can validate the incoming token.
Gathering Your Identity Provider’s (IDP) Public Key Details
In order to configure JWT Authentication, you will need to gather some information from your preferred identity provider (IDP). Common identity providers include:
- Okta
- Auth0
- AWS Cognito
- Azure Active Directory
You will need to provide the following information from your identity provider:
JSON Web Token Key Set (JWKS) URL
The JSON Web Key Set (JWKS) is a set of keys containing the public keys used to verify any JSON Web Token (JWT).
Examples:
- Okta ->
https://{my-okta-domain}.okta.com/oauth2/{my-okta-api}/v1/keys - Auth0 ->
https://{my-auth0-domain}.us.auth0.com/.well-known/jwks.json - AWS Cognito ->
https://cognito-idp.{region}.amazonaws.com/{userPoolId}/.well-known/jwks.json - Azure Active Directory ->
https://login.microsoftonline.com/{tenantId}/discovery/v2.0/keys
Issuer
The “iss” (issuer) claim identifies the principal that issued the JWT
Tip: The Issuer is often the custom domain given to you by your identity provider
Examples:
- Okta ->
https://{my-okta-domain}.okta.com/oauth2/{my-okta-api} - Auth0 ->
https://{my-auth0-domain}.us.auth0.com/ - AWS Cognito ->
https://cognito-idp.{region}.amazonaws.com/{userPoolId} - Azure Active Directory ->
https://login.microsoftonline.com/{tenantId}
Audience
The “aud” (audience) claim identifies the recipients for whom the JWT is intended.
Tip: This value is typically customizable and unique per application that is associated with your identity provider.
Examples:
- Okta ->
api://{my-app} - Auth0 ->
https://{my-app-domain} - AWS Cognito ->
https://{my-app-domain} - Azure Active Directory ->
https://{my-app-domain}
Scopes (Optional) The “scope” claim identifies the custom resources to which your JWT has access.
Tip: OIDC Standard scopes include: openid, profile, email
Configure JWT Authentication in Vendia Console
To setup JWT Authentication via the Vendia Console:
-
Navigate to your project landing page.
-
Choose the workspace for which you would like to configure JWT Authentication and click ‘Settings’ to navigate to workspace settings.
-
Click ‘Authentication’ —> ‘Add JWT’
-
Provide a
Namefor the JWT, theJWKS URL,Issuer, andAudiencevalues, and click ‘Create’.The
Scope(s)field is optional, so use it if your IDP requires it.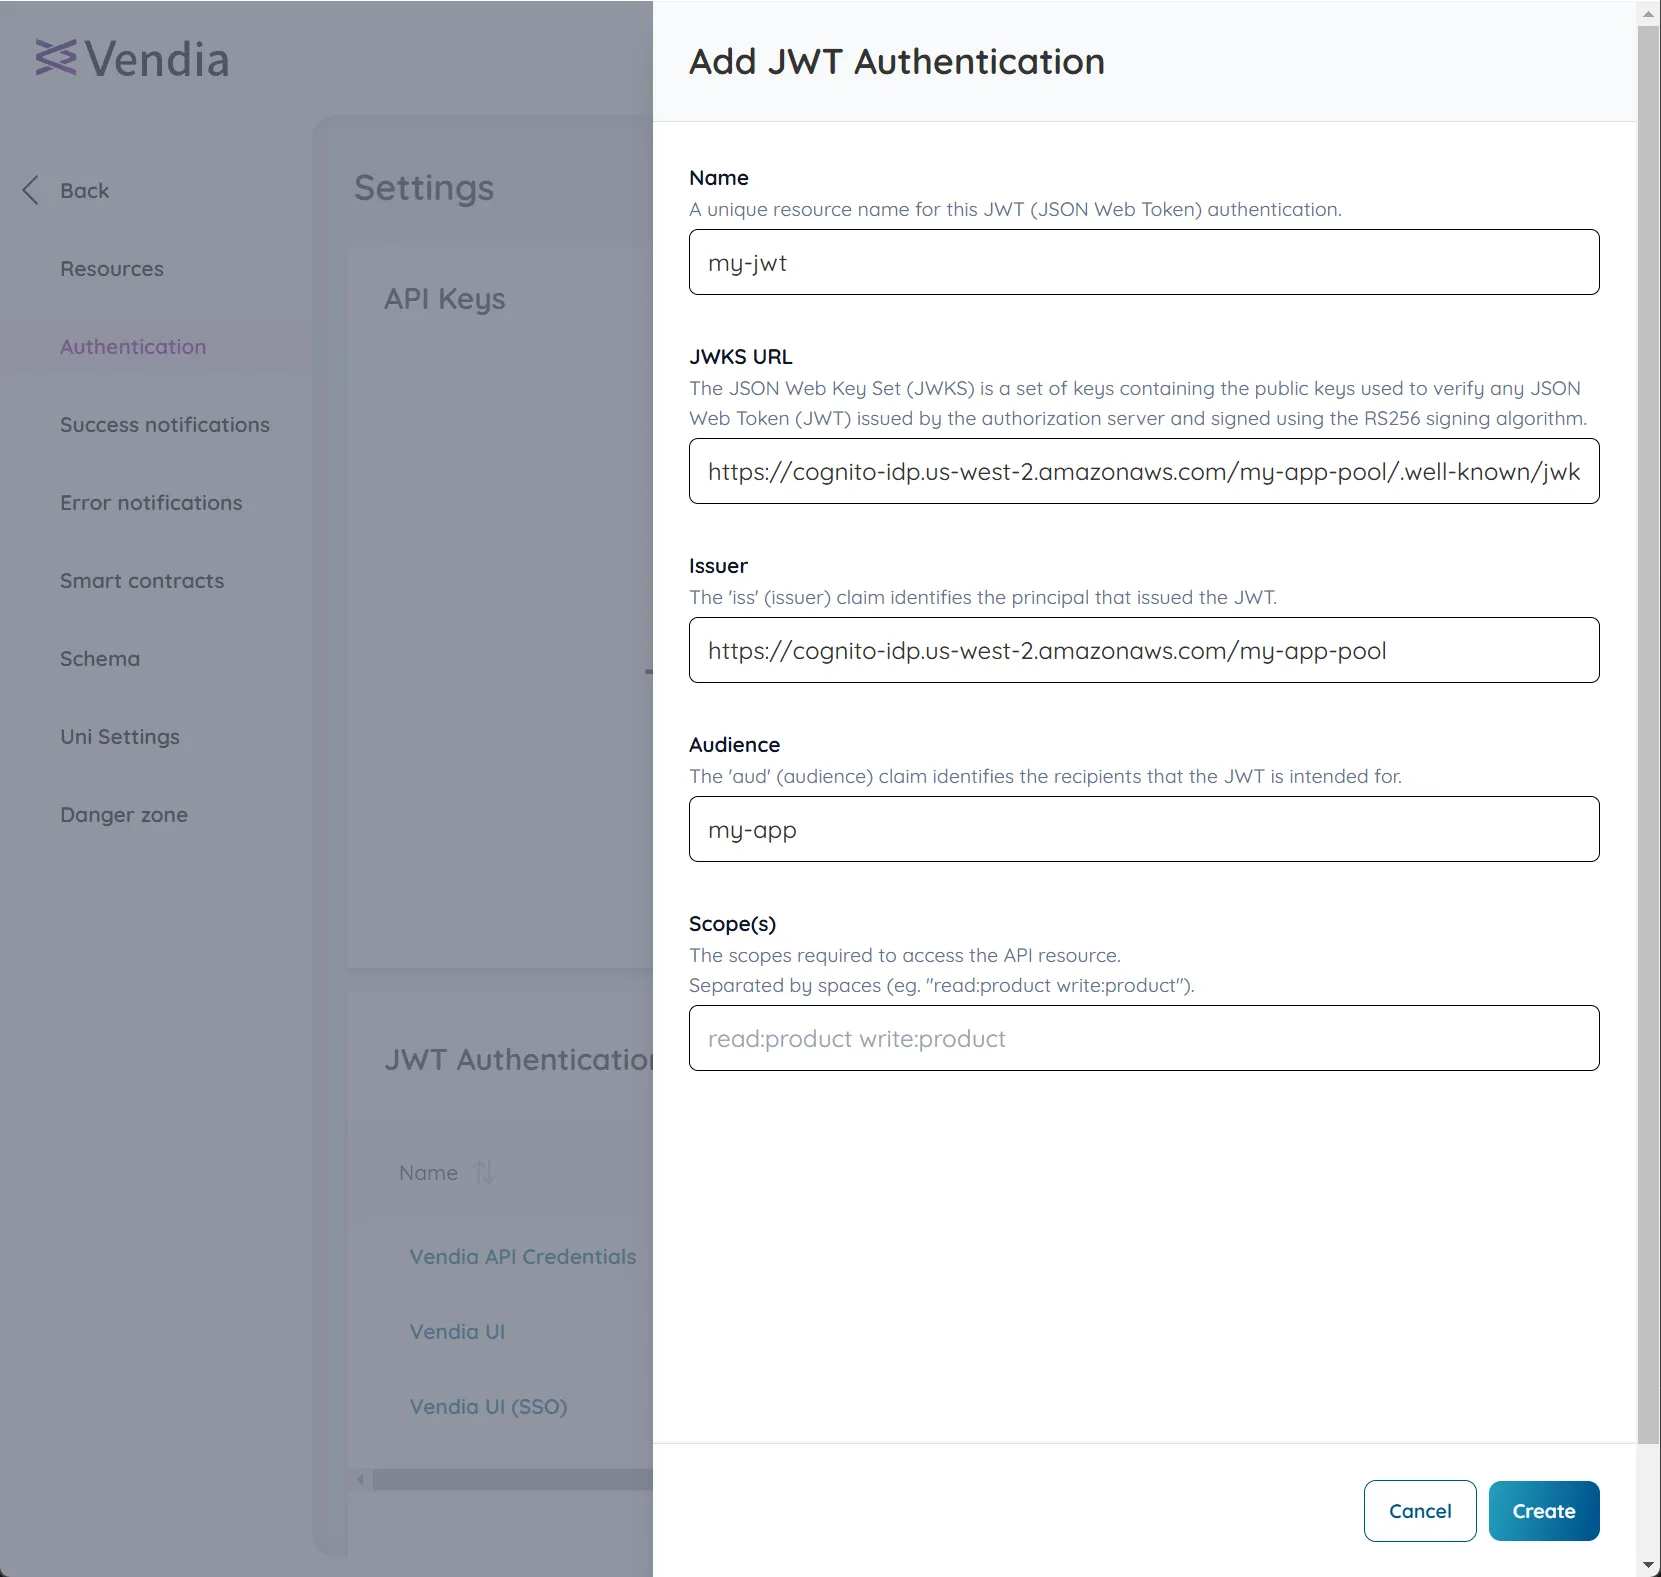
-
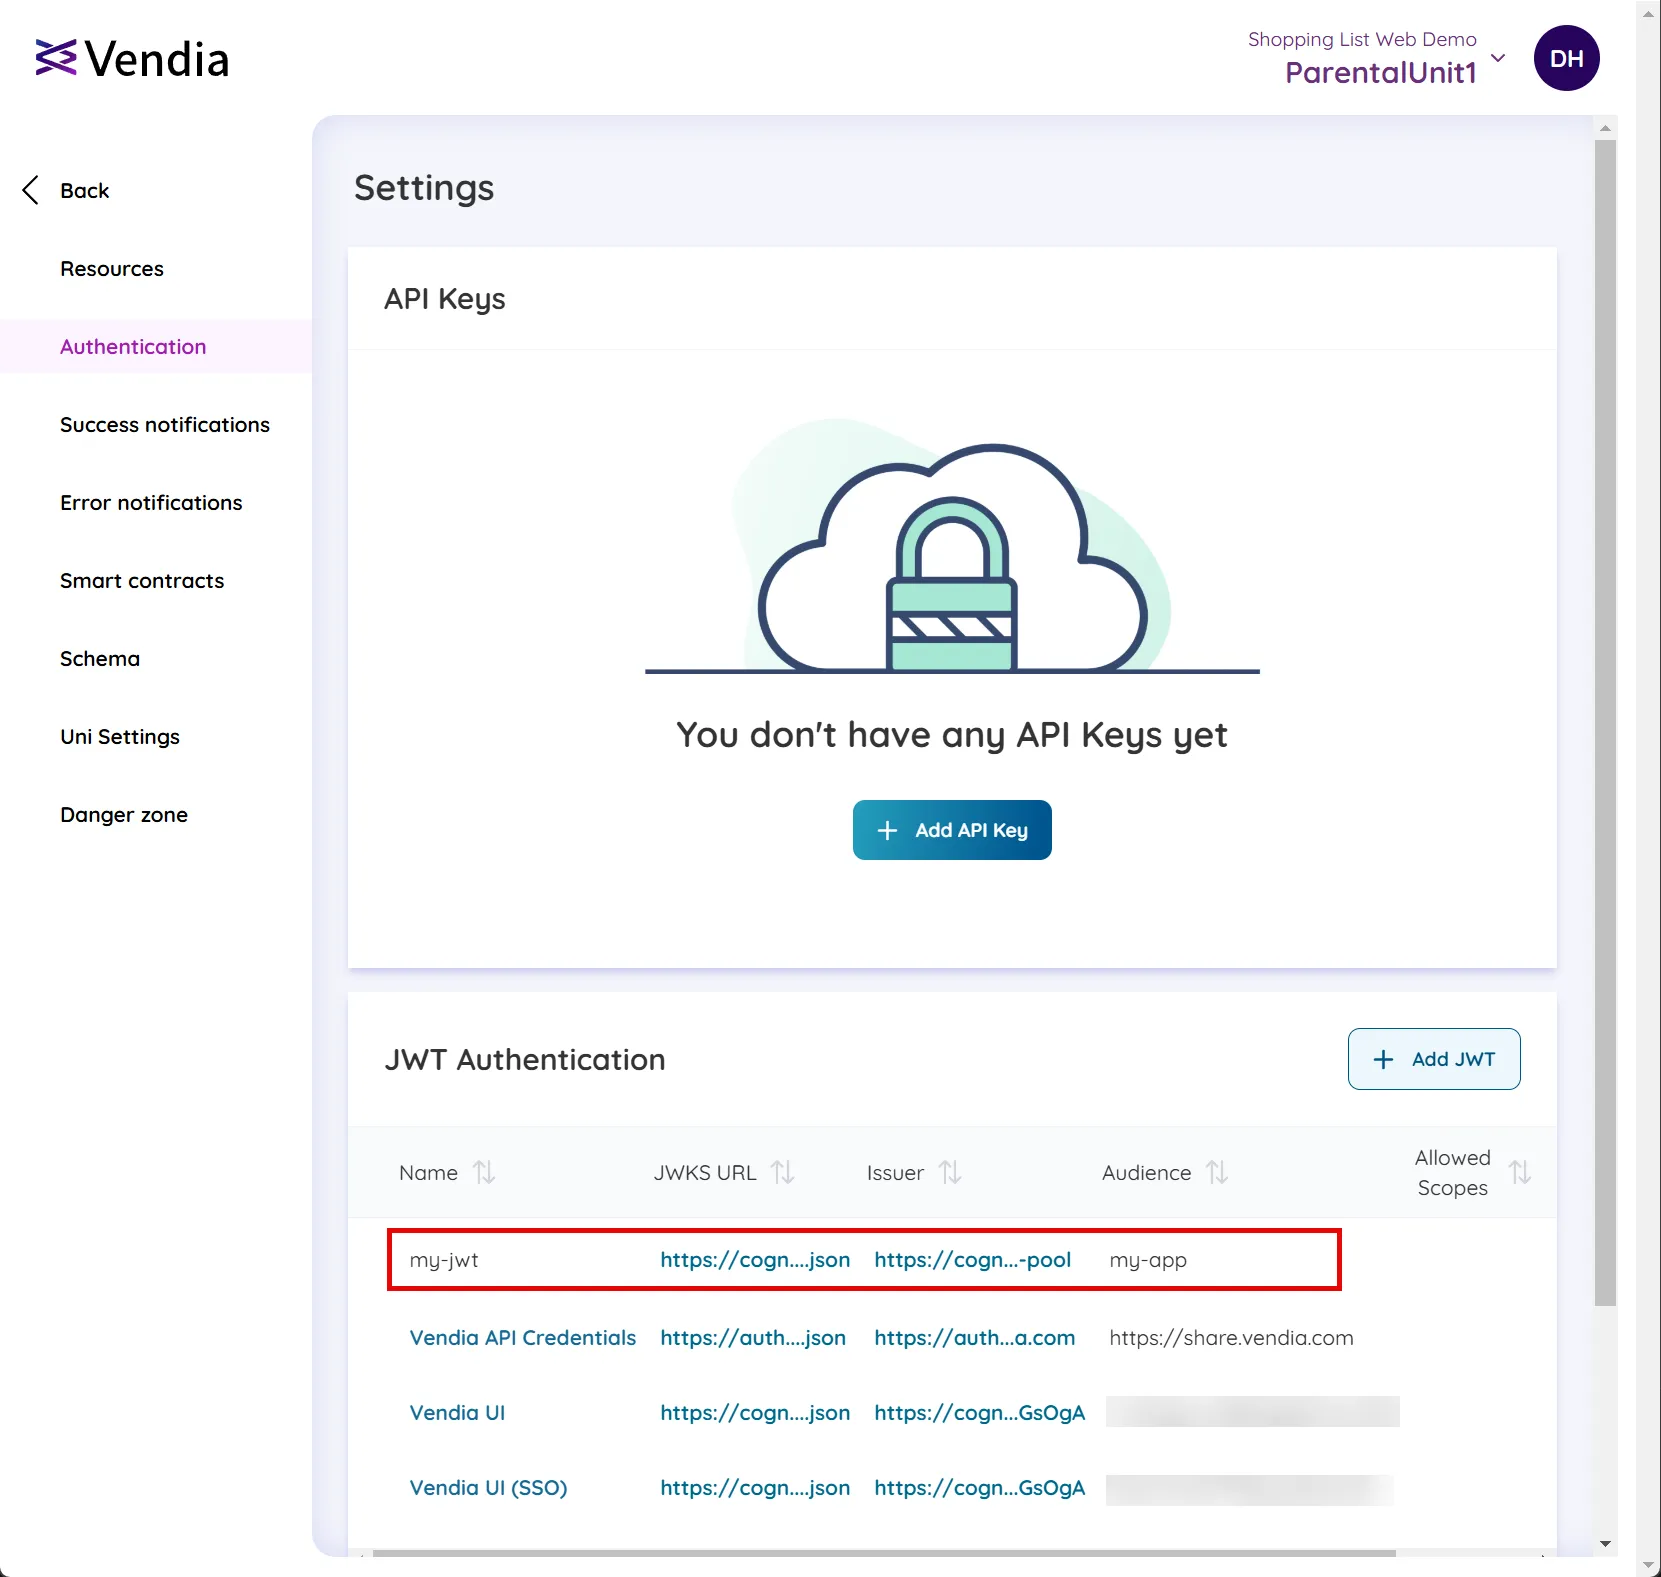
Click ‘Create’ to finish. You will then see the JWT listed in the ‘JWT Authentication’ section of the workspace Authentication settings screen.
Configure JWT Authentication via GraphQL
JWT Authentication can also be created via the GraphQL Explorer or programmatically (if you have already have a different authentication method configured).
mutation addJwtAuthentication { addVendia_JwtAuthentication( input: { name: "my-okta-app" jwksUrl: "https://{my-okta-domain}.okta.com/oauth2/{my-okta-api}/v1/keys" issuer: "https://{my-okta-domain}.okta.com/oauth2/{my-okta-api}" audience: "api://{my-app}" } syncMode: NODE_LEDGERED ) { result { _id } }}Using JWT Authentication
JWT Authentication can be used to access the workspace’s resources via the following methods:
Using JWT Authentication via GraphQL API
The JWT should be sent via the Authorization header of each GraphQL request, using the Bearer prefix
curl 'https://xxxxxxx.execute-api.us-west-2.amazonaws.com/graphql/' \ -H 'Authorization: Bearer MY_JWT_HERE' \ -H 'content-type: application/json' \ -H 'accept: application/json' \ --data-raw '{"query":"query blocksQuery { listVendia_BlockItems { Vendia_BlockItems { blockId blockHash } }}","variables":null,"operationName":"blocksQuery"}' \ --compressedUsing JWT Authentication via GraphQL WebSocket API
The API Key should be sent in the first message after connecting to the WebSocket
const subscription = ` subscription onBlockChanges {  onAddVendia_Block {    error    result {      blockId      transactions {        _id        mutations      }      _id      status    }  }}`;
const webSocket = new WebSocket(  "wss://xxxxxxx.execute-api.us-west-1.amazonaws.com/graphql", //Use your GraphQL WebSocket API here  "graphql-transport-ws");
webSocket.addEventListener("message", function (event) {  const data = JSON.parse(event.data);  console.log("Message from server ", data);  if (data?.type === "connection_ack") {    console.log("Received connection_ack");    console.log("Sending subscription...");    // Send GraphQL Subscription after Authentication handshake    webSocket.send(      JSON.stringify({        id: "4f4ac00c-8055-44ac-a048-c4c2c77573ce", // Note: should be unique per subscription        type: "subscribe",        payload: {          key: "vxyo52", // Note: should be unique per subscription          query: subscription,          data: `{"query":"${subscription}","variables":{}}`,        },      })    );  }});
// Send Authentication messagewebSocket.addEventListener("open", function () {  webSocket.send(    JSON.stringify({      type: "connection_init",      payload: { token: "MY_JWT_HERE" }, // Use your token here    })  );});
Using JWT Authentication via Vendia SDK
const client = createVendiaClient({  apiUrl: "https://xxxxxxx.execute-api.us-east-1.amazonaws.com/graphql/",  websocketUrl: "wss://xxxxxxx.execute-api.us-west-1.amazonaws.com/graphql",
  // Use getCredentials to perform any async logic needed to request a JWT from your  // auth provider - will be resolved prior to establishing socket connection or making an API call  getCredentials: async () => {    const token = await getTokenFromAuthProvider(); // Your custom logic to retrieve a token    return { token };  },});
const blocks = await client.blocks.list();client.blocks.onAdd((block) => console.log("New block added:", block));
API Credentials
API Credentials allow you to programmatically access both the Vendia Control Plane API (e.g. for listing and creating Unis) and Node APIs. Vendia API Credentials implement the OAuth Client Credentials flow and which exchanges the credentials for a short-lived access token.
Create API Credentials
-
Navigate to your Organization page and click ‘API Credentials’ in the left navigation pane.
-
Click ‘Create API Credentials’.
- You can then specify a
Name,Expiration, andRolefor your API Credentials.
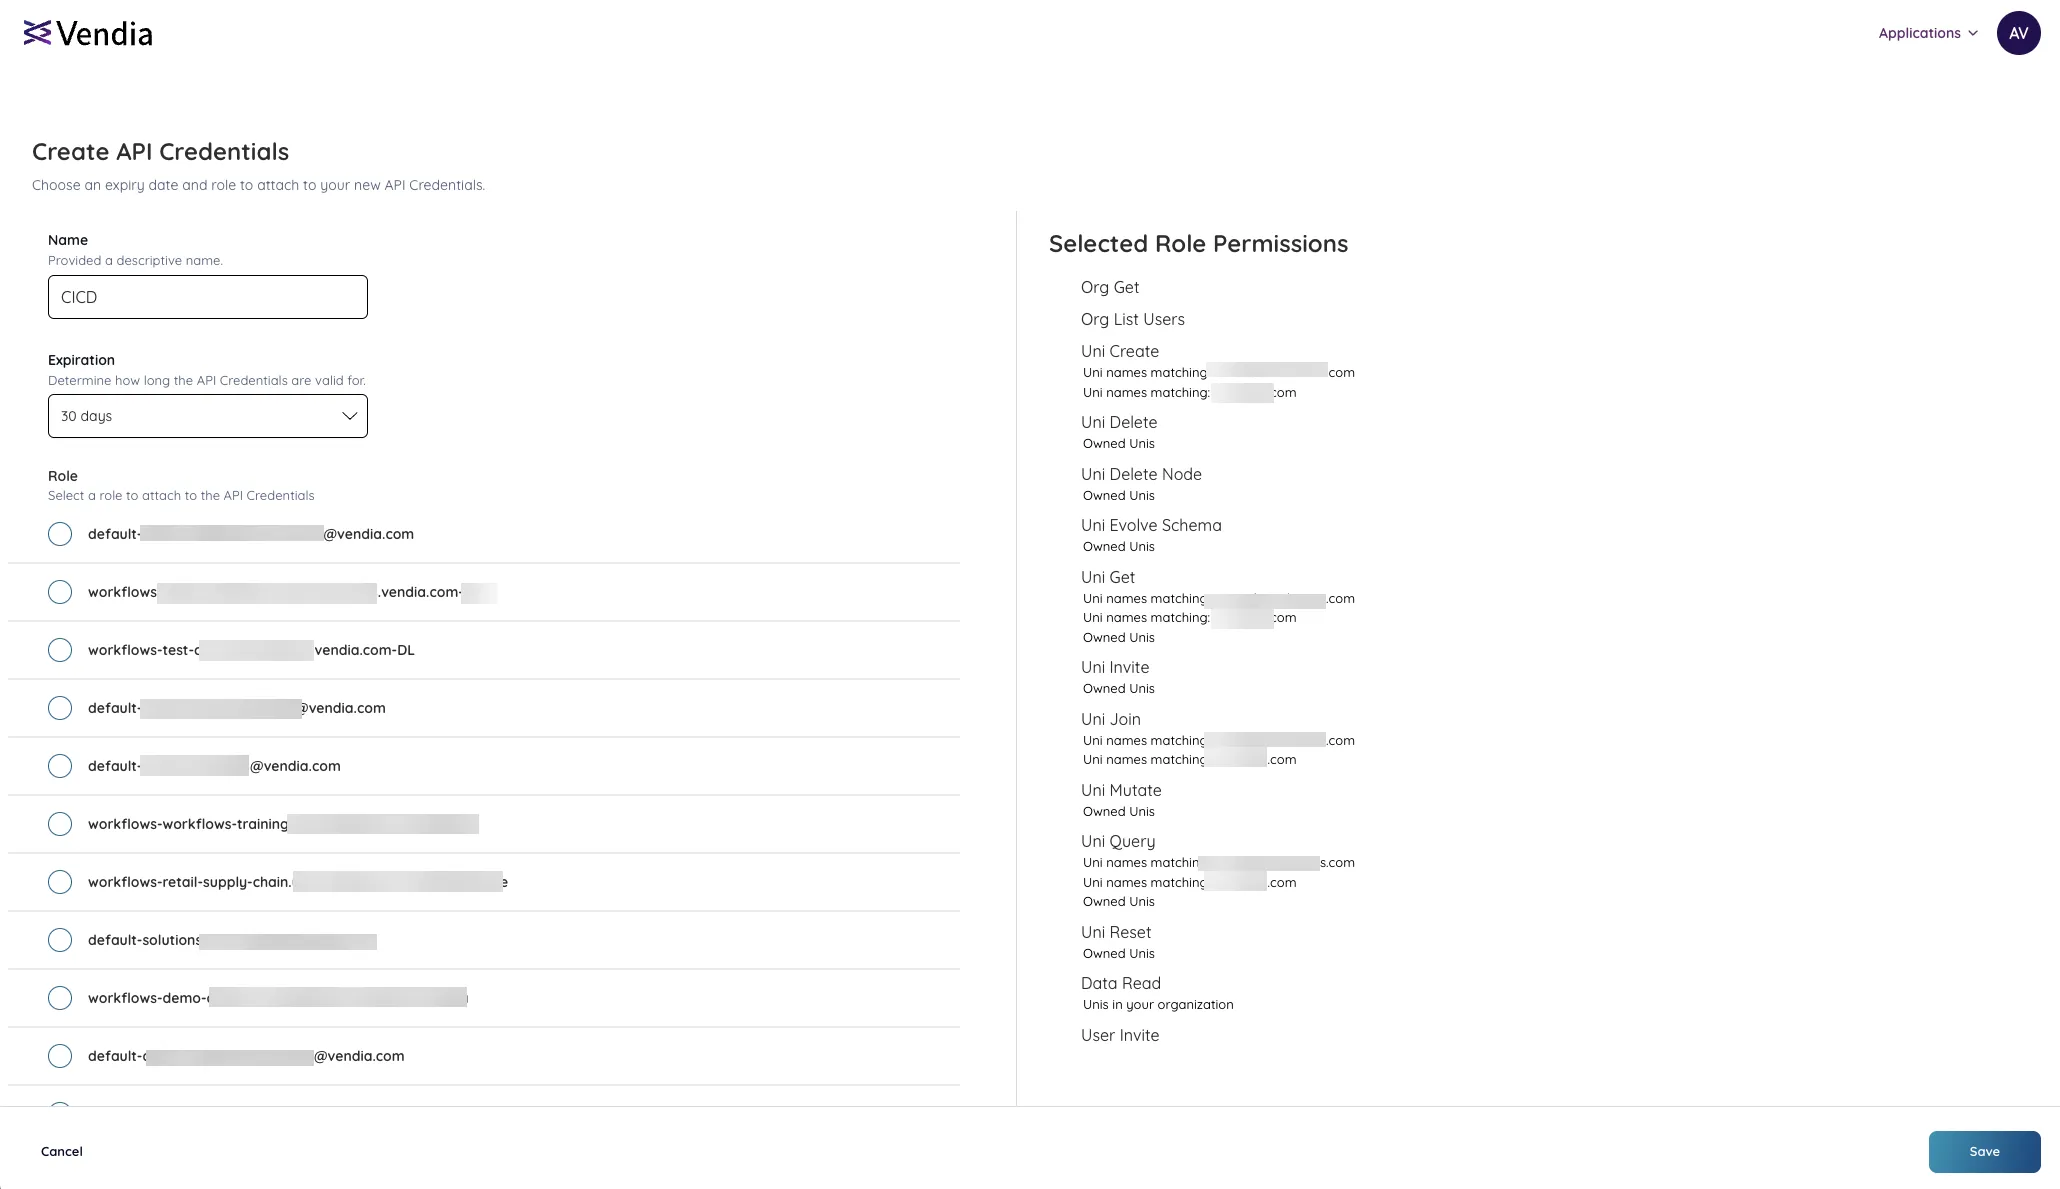
- Click ‘Save’ to complete the process.
- You can then specify a
-
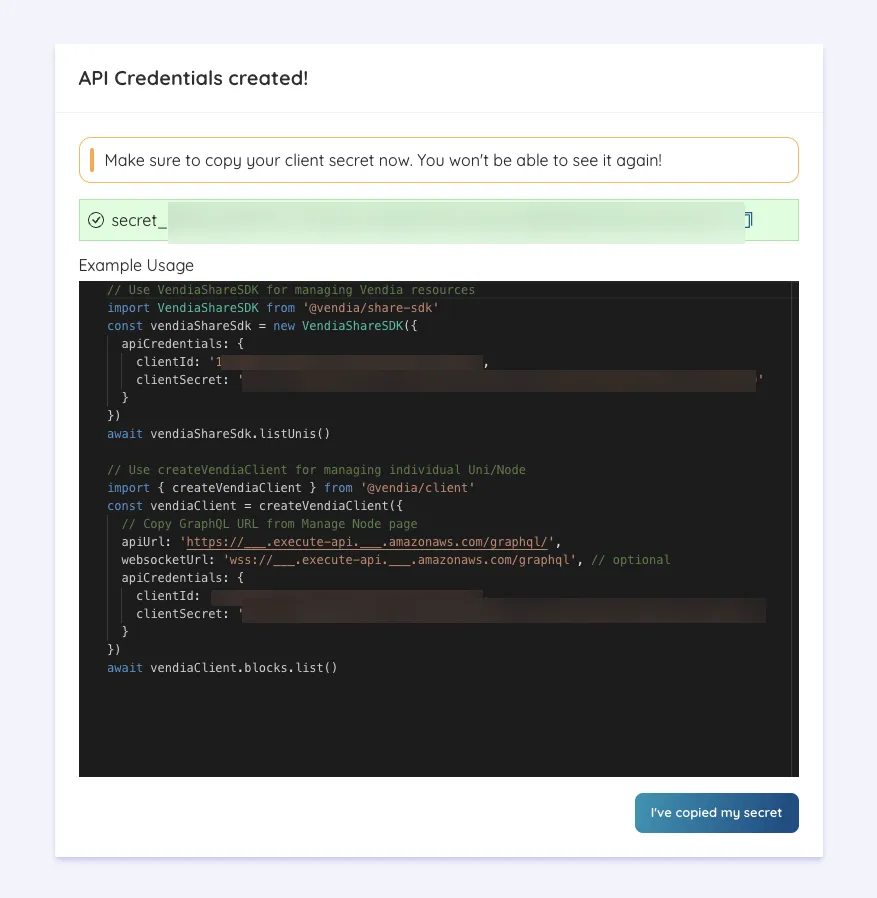
You are presented with your Client ID and Client Secret, as well as instructions on how to use them with the Vendia SDK.
Copy the key and store it securely as it will not be displayed again.
Use API Credentials
With Vendia SDK
Example output from creating API Credentials:
// Use VendiaShareSDK for managing Vendia resourcesimport VendiaShareSDK from "@vendia/share-sdk";const vendiaShareSdk = new VendiaShareSDK({  apiCredentials: {    clientId: "xxxxxxxxx-xxxxxxxxx-xxxx-xxxx-xxxxxxxxx",    clientSecret: "secret_xxxxxxxxxxxxxxxxxxxxxxxxxxx",  },});await vendiaShareSdk.listUnis();
// Use createVendiaClient for managing individual Uni/Nodeimport { createVendiaClient } from "@vendia/client";const vendiaClient = createVendiaClient({  // Copy GraphQL URL from Manage Node page  apiUrl: "https://___.execute-api.___.amazonaws.com/graphql/",  websocketUrl: "wss://___.execute-api.___.amazonaws.com/graphql", // optional  apiCredentials: {    clientId: "xxxxxxxxx-xxxxxxxxx-xxxx-xxxx-xxxxxxxxx",    clientSecret: "secret_xxxxxxxxxxxxxxxxxxxxxxxxxxx",  },});await vendiaClient.blocks.list();
As an Access Token
If you are not using the Vendia SDK, you can use the following flow to exchange your Client Credentials (Client ID and Client Secret) for an Access Token that can then be used to access the Vendia APIs.
For the best performance, cache your Access Token and only refresh it when it’s expired or close to expiring.
import { decode } from "jsonwebtoken";
let aliveAccessToken;
async function vendiaApiRequest() {  aliveAccessToken = isTokenExpired(aliveAccessToken)    ? await refreshAccessToken(CLIENT_ID, CLIENT_SECRET)    : aliveAccessToken;
  return fetch(NODE_API_URL, {    method: "POST",    headers: {      Authorization: `Bearer ${aliveAccessToken.access_token}`,      Accept: "application/json",      "Content-Type": "application/json",    },    body: JSON.stringify({      query: `query blocksQuery {        listVendia_BlockItems {          Vendia_BlockItems {            blockId            blockHash            }          }        }`,      variables: null,      operationName: "blocksQuery",    }),  });}
async function refreshAccessToken(clientId, clientSecret) {  const jsonBody = {    grant_type: "client_credentials",    client_id: clientId,    client_secret: clientSecret,  };  const urlEncodedBody = new URLSearchParams(    Object.entries(jsonBody)  ).toString();  const accessToken = await fetch("https://auth.share.vendia.com/token", {    method: "POST",    headers: {      "Content-Type": "application/x-www-form-urlencoded",    },    body: urlEncodedBody,  });  return accessToken.json();}
function isTokenExpired(accessToken) {  try {    if (!accessToken?.length) {      return true;    }
    const decodedJwt = decode(token, { complete: true });
    const payload = decodedJwt?.payload;
    if (!payload?.exp) return true;
    // Return true if the token is expired or about to expire (in ~5s)    const tokenExpiration = payload.exp * 1000;    return tokenExpiration < Date.now() - 5000;  } catch (e) {    console.warn("Unable to parse JWT", e);    return true;  }}